Creamy Beetroot, Mint and Pecan Dip

What do you do with left over beetroot? You make easy dip ofc!!

I love making dips at home. Firstly, you know EXACTLY what is in it! That is the best part. There is no added sugar, there are no preservatives, and no fake stuff. Plus, making dip is SOO easy! Trust me, once you start making your own, you will not go back to anything from the store. And this one is just so simple!

20170218_15220620170218_152157

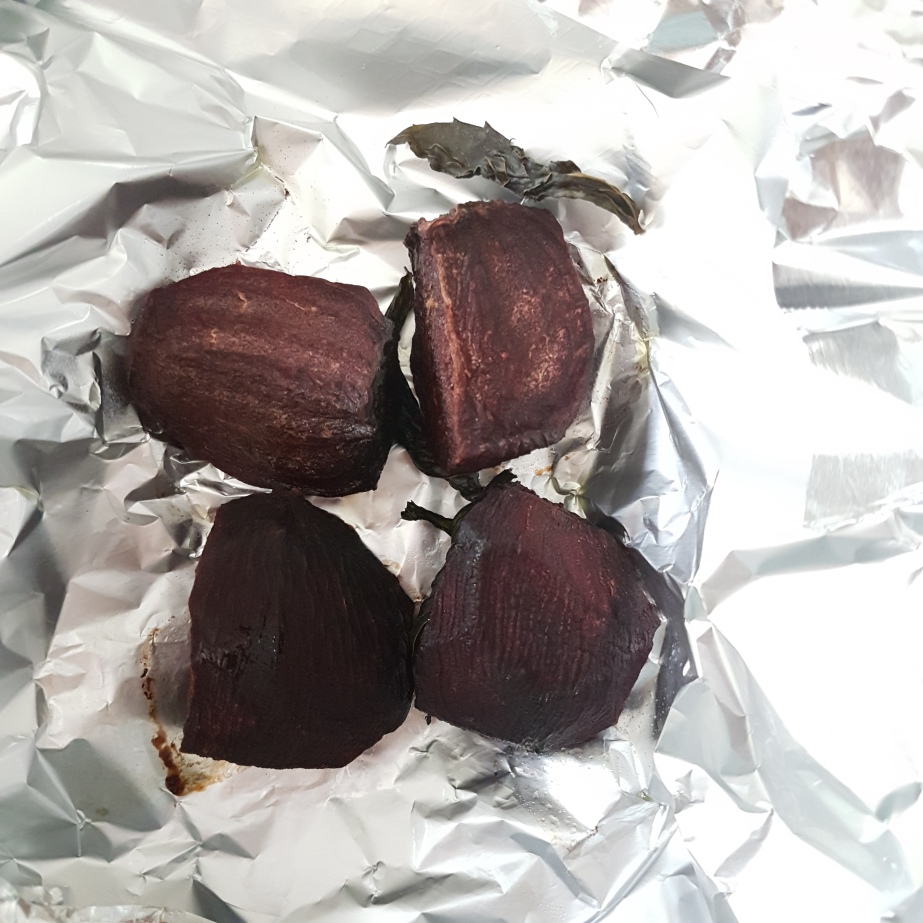
You can make this same recipe using tinned beetroot directly, but I love the sweetness that beetroot picks up from roasting it. It does mean the dip takes a bit longer to make, but it’s an easy step with no fuss. Just clean, peel, slice, roast and rest. o real heavy work.

20170218_130039.jpg

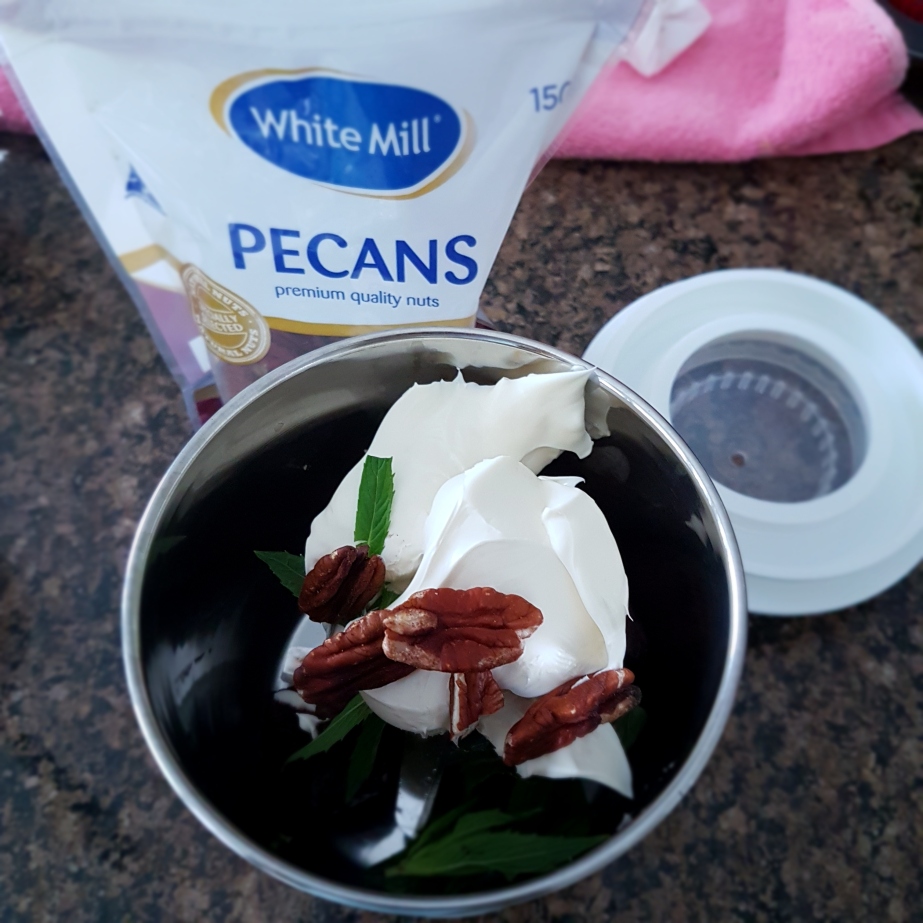
I like using pecans in this dip, largely because I always have pecans in the house.But you can use pine nuts, hazelnuts or even almonds. Literally grab what you have lying around to give this dip a delicious nutty texture and flavour. The mint just makes this dip so fresh and is the perfect compliment to sweet beetroot and the nuts too.

20170218_152528


Now if you have left over feta, go ahead and add that with the cream cheese. It will add a tasty salty element to the dip. Plain cream cheese works a treat, and that is usually how I do it.

All you need to do is blitz everything in a food processor until smooth and creamy and then serve with some chips, a touch of paprika and olive oil. Yum yum!

creamy beetroot, mint and pecan dip.jpg


Easy Blueberry Loaf

I was feeling kind of under the weather when I decided to make this loaf bread, but I thought… you know what? I have to do something! I couldn’t just waste the day away in bed with my episodes of New Girl and Chicago P.D. Yes. I am a tv show nut.

😀

Back to my loaf. Originally I wanted to make this loaf with oats, but alas I was out of oats. How this happened I have no clue. I leave the country for 3 months and my family just forgets to buy certain things! So I improvised and went with half self-raising and half whole wheat flour. Not everyone enjoys the sort of strong taste of the whole wheat. Now I loaded this loaf with blueberries. I literally wanted them to be bursting out from every little slice and direction. It’s like how I love my blueberry muffins – absolutely loaded.

20170225_181632

While writing out the recipe I couldn’t help but think about all the other recipes I wanted to try out, and ofc write! Things like doughnuts and other baked goodies. Even though I am not really baker. No harm in the attempt right? I am actually super excited to be cooking and baking! I have probably said it heaps of times, but now that I am working full-time I am incredibly psyched to be cooking and packing lunches and easy dinners. Oh and finally, I am not studying on the weekends!!! Do you know how much time I now have to dedicate to the miniature kitchen?!?

20170225_182109

Okay end of the rant. This recipe is very easy, and honestly doesn’t need much equipment. I just like to make sure the wet and dry ingredients are mixed separately. I make sure I whisk through the dry ingredients to break down any lumps and bumps prior to folding the wet ingredients with a a wooden spoon. It is THAT simple! Remember to keep the milk and egg out for a little time to raise the temperature slightly, in particular the egg. The egg MUST be at room temp!

In terms of the milk, I went ahead and made my own buttermilk. All you need to do is mix the whole milk with apple cider vinegar, or lemon juice. Personally I think either works a treat. You need to let this sit out for around 15-30 minutes to allow the buttermilk to prepare. Of course… you could just buy the buttermilk, but sometimes making it yourself is fun too! You can otherwise add 2 spoons of yogurt to the milk and whisk that through.

20170225_181214

20170225_181515

When preparing the blueberries you need to do an extra step. I prefer using frozen berries because they don’t rip apart at the slightest touch, but fresh is obviously better. In either case you need to coat the blueberries with 1 tablespoon of flour. What this essentially does is ensures that the blueberries do not ALL sink to the bottom. It’s sort of acts like an adhesive to the wet batter and holds the berries up while baking. Don’t believe me? Look at the little specks of blue/black while this bad boy was baking! They stayed right at the top 🙂 Without the flour, the berries would have collected at the bottom so that when you sliced into the loaf you would just have lumps of berries down the bottom and not a pretty result 😛

20170225_185610


Alrighty! Recipe card time! 😀 Do we like these cards? I’m hoping to add a few features to these cards, so stay tuned! You will notice in the recipe I write that you can cover the loaf tin if the color of the bread has already developed into a lovely golden brown. Cover it with aluminum foil to actually stop the top from burning, and trap a lot of the heat within the space under the foil to essentially steam the rest of the loaf. This will ensure a lovely crust, and deliciously soft and moist bread.

Easy blueberry loaf.jpg

Seriously, try the recipe. It’s moist and delicious and oh so good.


Vegetarian Pizzas Four ways

I invited my friends over, fairly last minute I must say, and decided I should cook something EASY for them. Mainly because every time we do end up cooking, it is so complicated or attention heavy that we don’t end up spending quality time together. So I figured some yummy home-made pizzas were the easiest way to go.

DSC09946.JPG

Now… i bought pre-made pizza bases from Aldi because not only are they cheap, but they come with a an oily-garlicly spread all over it. I find that these bases don’t dry out AT all which is wonderful.

I chose to make 4 different pizzas to mix things up a little you know. Keeps things exciting 🙂 To start this big post post, we need to make my pizza base sauce first. I use this sauce all the time for my homemade pizzas because it just works and tastes really great on the pizza. Here is my simple recipe, and you can make it a few days in advance and just keep it in the fridge before you use it.

DSC09945.JPG

pizza sauce.jpg

Now we move onto my balsamic glaze. This is the thing that can make your ordinary pizza into something truly extraordinary. You can drizzle it over almost any pizza topping, but I love it over my Rocket and Goats cheese pizza. It just compliments the goats cheese so damn well! I add a little extra sugar and salt to my reduction just to cut down the really strong flavour of the vinegar. Here is the recipe!

balsamic glaze.jpg

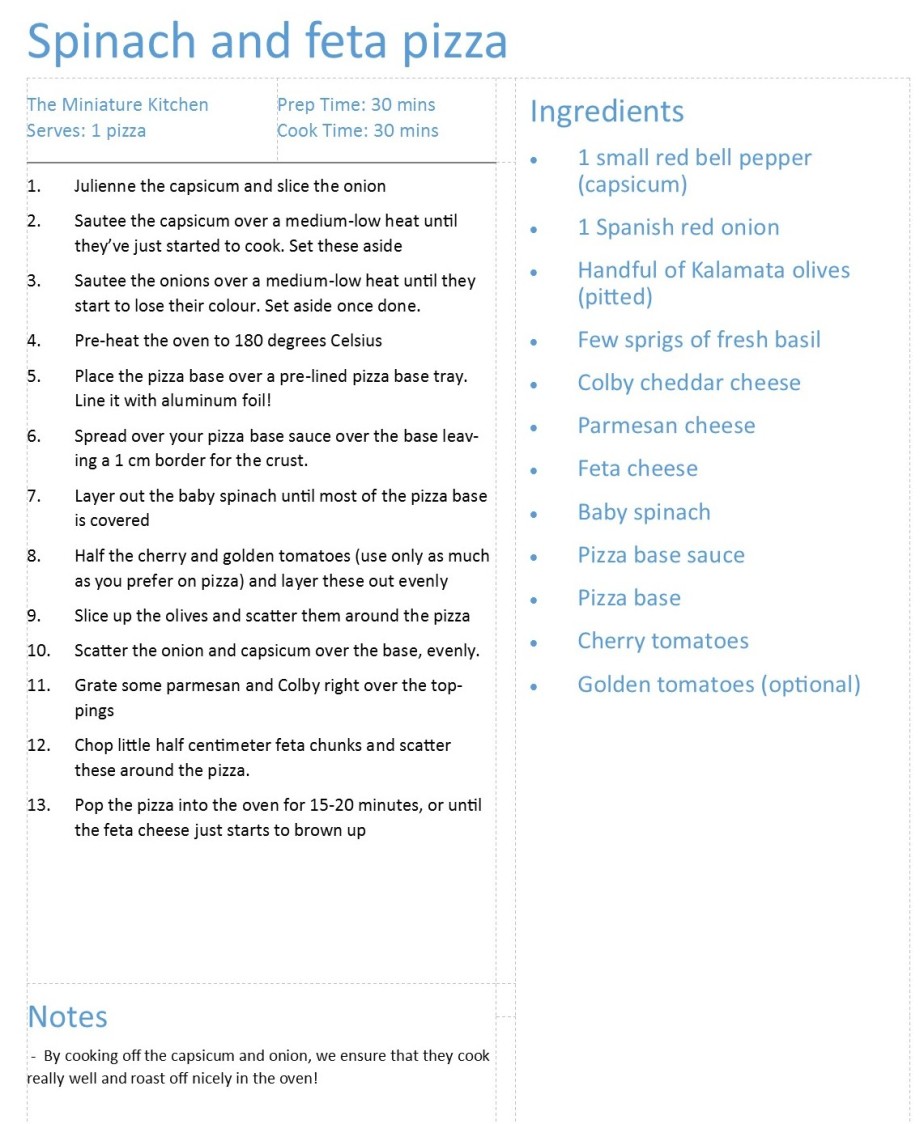
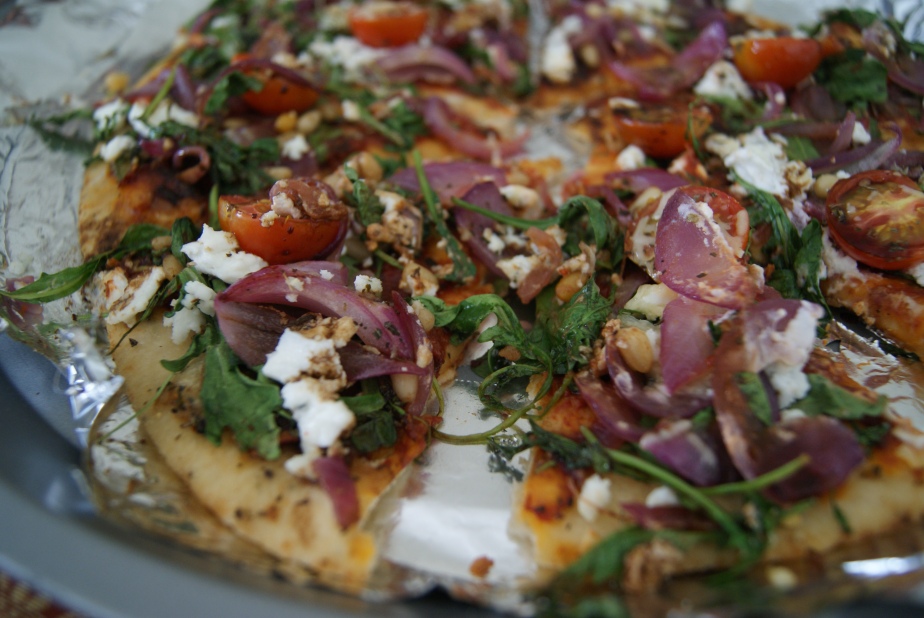
Now to the main star(s). I’m starting with my Spinach and Feta pizza. I pack it with capsicum, onion and olives too for a really vege-ful bite. Basil is an essential piece of the pizza too, along with some cherry tomatoes. This is just a classic pizza, packed with flavour.

spinach and feta pizza


DSC09962.JPG

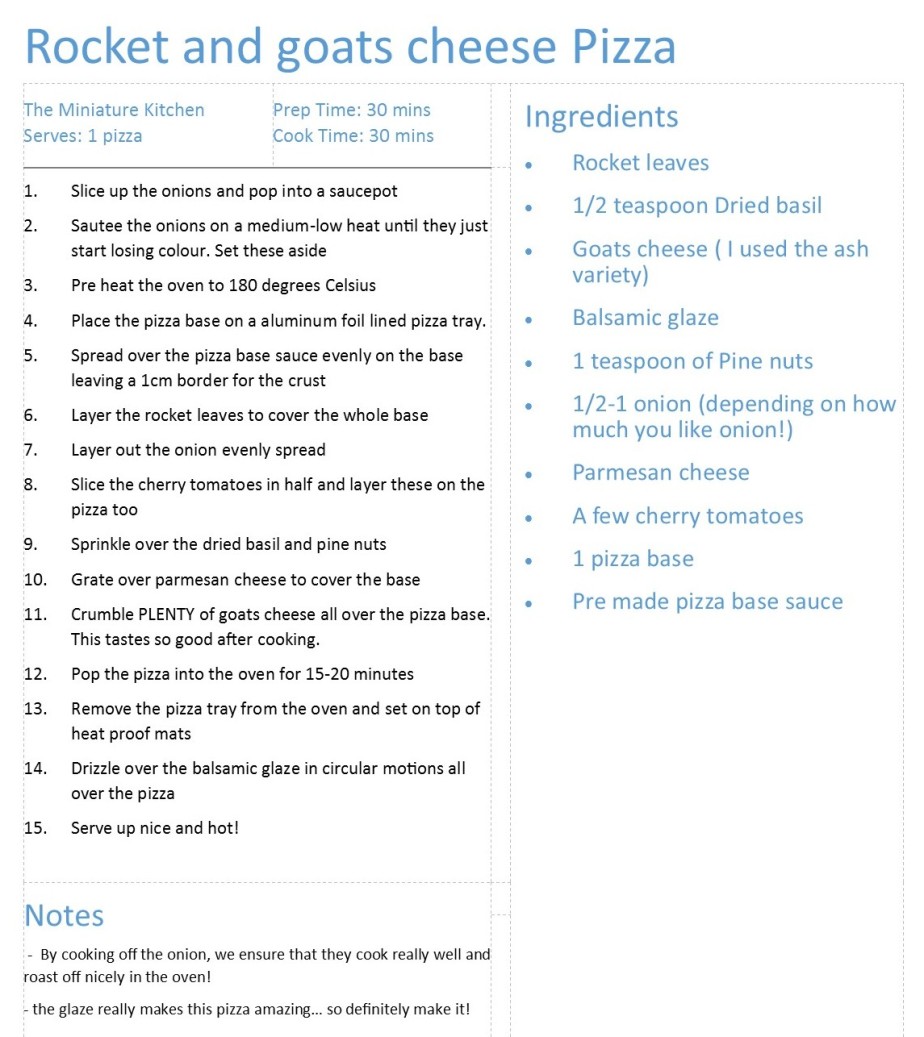
Number two is my honest favourite pizza – rocket and goats cheese pizza with balsamic glaze. It is so freaking easy, and it is one I love. My friends enjoyed it too. They mmmm-ed so I’m going to say yes they like it very much.

rocket and goats cheese

DSC09960.JPG

Number three is the easy magherita. Packed with tomatoes, basil and cheese, you can never go wrong with it.

maghertia

Number four is basically a variation of the maghertia, just with a pesto base. It changes the flavour completely and just changes up the tastes. It’s a great way to use up any left over basil pesto in the house 😀

pesto marg

DSC09981.JPG

So have a go at these four super simple but yummy pizzas. I asked my friends like 10 times to tell me if they enjoyed it… and they said yes… so if you all hate the recipes…

Blame it on them.


Lime and Coconut and Pancakes

SONY DSC
the end result!

Pancakes are just the best thing in the world, and they are truly the best pick me up after a really long or hard day. I tend to save these for the congratulations-on-finishing-exams or time-to-cheer-up kind of days.

This is one of my absolute favourite pancake recipes to make. For those that know anything about me know just how much I truly love coconut. The recipe is 10000% more appealing because it is totally eggless and can very easily be made into a vegan variation for which I will give details below!

What you need?

  • 3/4 cup of plain flour
  • 1/4 of self raising flour
  • 1/4 teaspoon of baking powder
  • pinch of baking soda
  • 1 teaspoon of white vinegar (this is the flufffffing agent 😛 )
  • 1 lime (we are going to use the rind and juice)
  • some milk (I used full cream, but you can use almond, coconut, rice or soy)
  • 1 heaped tablespoon of yogurt (I used a naturally sweetened variety. If you are vegan you can use some coconut whip)
  • 1/2 teaspoon of vanilla extract or essence
  • 1/4 teaspoon of coconut essence (this stuff is super strong!)
  • less than 1/4 cup of desiccated coconut
  • some butter for frying
  • toasted coconut shavings **optional** (for garnishing)
  • whipped cream (or thickened cream like I used)
  • powdered sugar and maple syrup (of course)

What to do?

  1. Mix the milk and yogurt in a cup and set aside
  2. Sift the flours and add them to a bowl
  3. Add the baking powder and soda to the flours
  4. Add the vinegar straight over the baking powder and soda and watch them fizz up
  5. Add the vanilla and coconut essence to the flours
  6. Add the rind of half the lime.
  7. Grab a whisk and break up the flours before adding the juice of a bit over half a lime. If you like a really tangy flavour, add more lime juice.
  8. Add the desiccated coconut and whisk through well
  9. Now whisk through the milk and yogurt mixture, little by little, until you achieve a thick pancake batter. It should be thick enough to hold a trail when spooning it out.
  10. Heat some butter in a fry pan and spread it around everywhere, on a low flame. I think its best to start on a low heat.
  11. Using a ladle, spoon out one ladle full of the batter and pour it straight into the center of the fry pan and watch the batter spread out.
  12. Allow the pancake to fry until you see bubbles form around the sides of the pancake. This may take a few minutes
  13. Flip the pancake, and allow the pancake to cook for a few minutes
  14. Remove the pancake and then repeat steps 10 to 13. Generate a stack of pancakes for serving.
  15. To serve, top the stack with the toasted coconut flakes, maybe some pecans, maybe some more lime rind… I went with some coconut infused whipped cream. To do this pour some thickened cream into a bowl and add a few drops of coconut essence. Grab your whisk and whip away!

These pancakes are super tangy and coconutty and I truly love them. They are a really wonderful summer breakfast treat and great cheat to your healthy week. Better yet, the pancakes are eggless which will prevent you feeling bloated in the mornings. And, the pancakes themselves are sugarfree. I choose to allow the vanilla and the maple syrup topping to do all the sweetening. Thus, the pancake itself can be eaten by diabetics, like my dad, absolutely guilt free. Just add some sugarfree whipped cream and you are good to go.

Let me know what you think of this recipe! I really would love to hear feedback! I apologise in advance for not having photos of all the steps. I am a truly terrible photographer and well.. they all look a little funny 😛